Wednesday, April 27, 2011

April Shower and May flower


I have been seening umbrellas everywhere! The other day I heard someone say the quote about April showers bringing May flowers.  When I heard that I thought that would be such a great theme for a table setting.  Here are some places I have seen umbrellas lately......


Heres my inspired umbrella setting...........


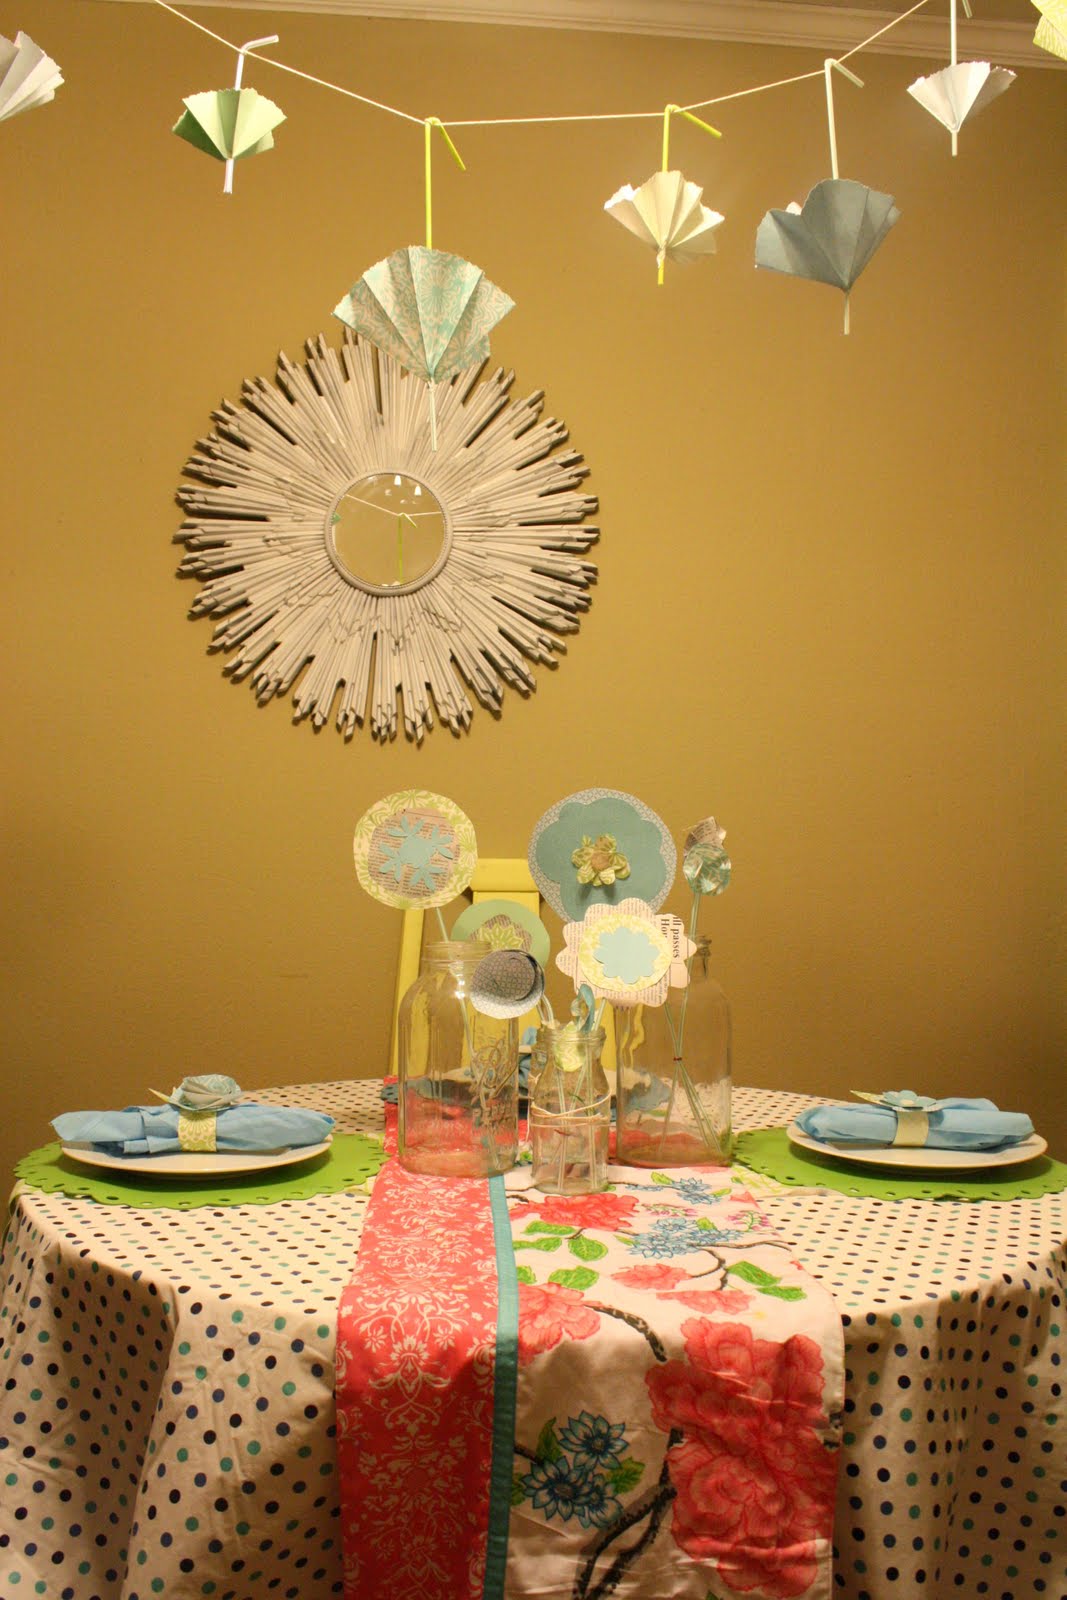
I tried to find a tutorial online to make paper umbrellas, unfortunately there was none. I had to come up with my own pattern.  I cut out a circle of scrap paper and fold it in half different ways about 5 times. After this I folded every other crease in.  This makes the top of the umbrella.  I cut a hole in the top and stuck a straw through.  I used white straws and spray painted them blue and green. After I got the top of the umbrella where I wanted it on the straw I put glue on the straw and clothes pinned the top to the straw until it dried.  When all the umbrellas were made I tacked up a string from one side of the ceiling to the other with some slack.   I then hung the umbrellas from it.
To make the napkin rings I took a toilet paper roll and cut it into 3 pieces.  I took each one and made a napkin ring out of them.  I first covered them with colorful scrapbook paper and then glued different flowers to each one.


**more detailed instructions to come**

Saturday, April 16, 2011

Easter Table

I am so excited to introduce my Easter Table.  I have taken tutorials from several blogs and combined all these great ideas to make one great tablescape.  Scroll down and enjoy!

I found this vintage tablecloth at a garage sale for $2.


Napking holder: Crepe paper flowers hot glued to ribbon and tied around a napkin. To make these awesome crepe paper flowers visit Dear Lillie.

I covered eggs with tissue paper and scrapbook paper.  All I did was cover the egg in Elmer's glue and then I cut out shapes from the scrapbook paper/tissue paper and placed them onto the plastic eggs.

Bunny Banner: Marth Stewart template cut out onto old wallpaper and attached to string.

Place cards: Brass candle sticks spray painted white.  Attached to the candle sticks is a place card made out of srapbook papers.  I placed  Easter eggs covered scrapbook paper ontop of the candle sticks.


Thursday, April 14, 2011

Shirt Refashion: Shirt to Vest

 I found this shirt that I liked on the rack, but when I tried it on it gaped awkwardly in the front. I really liked the print and the ruffles and couldn't seem to part with it. It was on super clearance for $2 so I went ahead and bought it, knowing I could refashion it.


I couldn't pass up such a great deal.


Before

The fitted back and gaping front reminded me of the way vests fit. So what did I do? Cut up the middle of the front of the shirt to make a vest. I thought it would be as simple as that- cut and hem. But I was wrong. The front fell really weird. However, I somehow accidentally realized that if I did a basting stitch and then gathered up the seam, it would bunch up, pulling the front of the vest forward more. That also gave it a little ruffle on the hems. Here are the results:

Just Normal                                                                                                     Belted


Tuesday, April 12, 2011

belt re-do

I had seen a belt that I really liked at J. Crew.  I found this belt at a thrift store for less than a dollar, and I figured I could work some magic on it.
After:
How to: I used some ivory fabric, and two different kinds of lace.  For the two pieces of lace I twisted them and then wrapped it around. For more explicit details visit http://www.youtube.com/watch?v=BR0wHMvWTzo.  For the ivory flower I took a strip about 2" wide and a 8" long.  I cut slits about 1/4" from eachother, and then I rolled it and fluffed.  After I finished making all the flowers I hotglued them onto the gold buckle of the belt.

Friday, April 8, 2011

DIY frame

One day I was painting outside and a twig fell into the paint bucket.  I took it out and I liked the way it looked.  Pretty soon I was throwing all the twigs I could find into the paint bucket.  Then the question was: What to do with all these paint covered branches. Answer! Use one of my many picture frames laying around! I love how it turned out, I hope you do too.

Materials:
  • Paint
  • Picture Frame
  • Twigs
  • Fake flowers
  • Plaster of Paris
Drop the twigs into the paint and set them to dry on a plastic surface (I used a plastic grocery bag).
Drop the flowers in the plaster of paris and let them dry.
Glue the covered twigs and flowers onto the frame.


linked to:

Sunday, April 3, 2011

Wood shelves Before and After

The space above my television was looking dull.  I thought about putting shelves, and I have been frantically searching for the right ones.  Then the idea hit me: Why don't I turn old logs into shelves.  I found the perfect size logs and cut them in half, and the rest is history........

Before:
After: